- Shower Panels
-
Showering
- Shower Doors & Enclosures
- Walk In Showers
- Shower Trays
- Shower Valves
- Bath Shower Screens
- Shower Accessories & Spares
- Shower Pumps
- View all products...
-
Bathroom Suites
- Complete Bathroom Suites
- Baths
- Toilets & Bidets
- Basins
- View all products...
-
Furniture
- Bathroom Furniture
- Wall Cabinets
- Toilets & Cisterns For Furniture
- Worktops & Vanity Counter Tops
- View all products...
- Taps
- Radiators
- Wet Rooms
-
Ceilings, Floors, Tiles
- PVC Ceiling Panels
- Bathroom Flooring
- Tiles, Tile Trims & Adhesives
- Underfloor / Undertile Heating
- View all products...
- Accessories
- Extras
- Plumbing
Replacing Old Silicone Sealant
Replacing Old Silicone Sealant
In this tutorial we will explain how to remove and replace your old silicone sealant. The process is virtually the same for any silicone in the home, whether it be in your bathroom or kitchen.
Tools required:
- Silicone Removal Tool
- Sealant Removal Fluid (optional)
- PVCu Solvent Cleaner
- Extendable Blade Knife
- Masking Tape
- Fugi Tool (Sealant Smoothing Tool)
- New Silicone Sealant
- Sealant Gun
Removing Old Sealant.
The first step is to remove the old silicone sealant from the surfaces, Take the extendable blade knife and blunt the edge slightly with abrasive paper so as to not dig into the plastic or enamel of the surfaces the silicone is on.
Slowly cut along the edges of the old silicone sealant with the blade getting deeper each time. The previous steps can also be performed with a silicone removal tool.

This part is optional, but we recommend the use of a PVCu solvent cleaner or silicone sealant removal fluid as an agent to help weaken the silicones bond. A cleaner like this is used to clean PVCu and remove grease before applying silicone. When applied liberally to existing silicone it loosens the grip, making it easier to rub or scrape off. Always test this on a small unseen part of the bath or shower in case of reaction before applying liberally with a cloth.
The knife can now be used to remove the remaining sealant, using the solvent cleaner again for any stubborn sealant.
Applying New Sealant.
Before applying the new sealant make sure the surface is clean from any remains of old sealant and grease.
Apply masking tape both above and below the area you wish to seal. This will aid clean up at the end of the process and keep your silicone application accurate.
This next step only applies when replacing sealant on a bath. Your bath will sink slightly once it's filled with water, so you should fill up the bath before sealing to replicate this. If you seal an empty bath, the sealant could crack as it expands when you first use it.
To prepare the silicone for use first cut the end from the threads on the top of the silicone tube, then cut the nozzle at a 45 degree angle, this will make applying the sealant easier. It can now be put in the sealant gun ready for use.
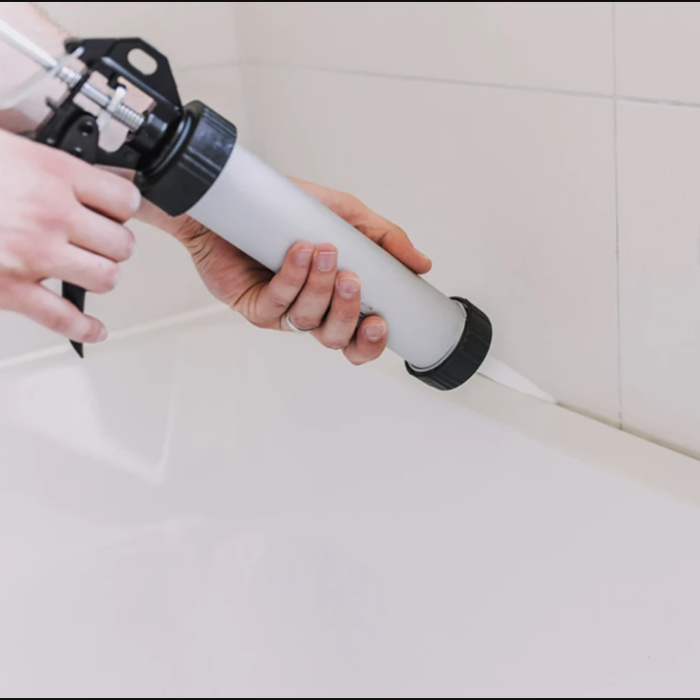
When applying the sealant it is best practice to do it all in one go to avoid any overlapping. It is important to be patient when applying the sealant with a gun, applying even pressure and proceeding slowly and smoothly is the key to a good finish.
Once the sealant has been applied it needs to be smoothed. This is best done with a smoothing tool known as a “Fugi Tool” although other rounded tools or a finger can be used if you don’t have a Fugi Tool available. The sealant must be smoothed to an angle that assists the flow of water away from the seal.
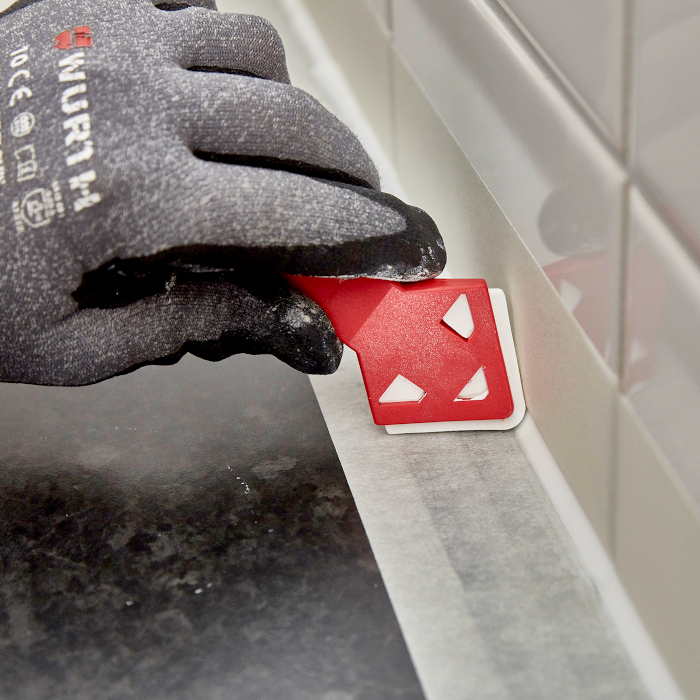
The masking tape can now be removed and any excess sealant cleaned off with a damp cloth. The sealant should be left for 24hr to fully cure before use. If it is your bath that has been sealed leave the water in the bath until the sealant has fully set.
This guide was created for reference only. www.rubberduckbathrooms.co.uk can not be held responsible for injury or damage caused if you decide to use this method.