- Shower Panels
-
Showering
- Shower Doors & Enclosures
- Walk In Showers & Wetroom Glass
- Shower Trays
- Shower Valves
- Bath Shower Screens
- Shower Accessories & Spares
- Shower Pumps
- View all products...
-
Bathroom Suites
- Complete Bathroom Suites
- Baths
- Toilets & Bidets
- Basins
- View all products...
- Taps
-
Furniture
- Bathroom Furniture
- Wall Cabinets
- Toilets & Cisterns For Furniture
- Worktops & Vanity Counter Tops
- View all products...
- Radiators
-
Ceilings, Floors, Tiles
- PVC Ceiling Panels
- Bathroom Flooring
- Tiles, Tile Trims & Adhesives
- Underfloor / Undertile Heating
- View all products...
- Accessories
- Extras
- Plumbing
- Wet Rooms


How To Install A Shower With A Fast Fit Kit - Article
Fitting a bar mixer or exposed shower is easy with the use of a shower fast fit kit. Here is how to install a shower using a fast fit shower fitting kit.
Items you will need:
- Drill
- Tile Drill Bit (if you walls are tiled)
- Masonry Drill Bit
- Pipe Cutter
- Screwdriver
- 2x Adjustable Spanners
- Pen or marker
- Spirit Level
- Fast Fit Shower Kit
- The Shower Valve
This article will show you how to attach your shower valve onto the pipework using an Aqualisa fixing kit but there are a few variations but are all similar in the way they work.
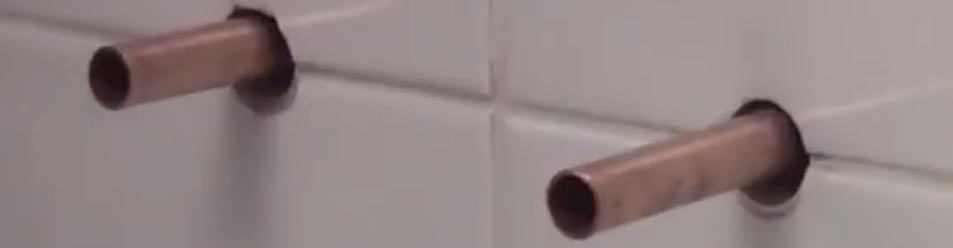
We will start by assuming you have already 1st fixed the pipe work and have pipes (either copper or speedfit) protruding from the wall at the intended location with 150mm centres. These pipes should also be level and square to the wall, which should now be fully tiled & grouted or have shower wall board installed. We also assume the water to these pipes is turned off either at their own isolation valves or at the house stop tap and the pipes are drained.
The next task is to ensure that the pipes protrude out from the wall the correct amount according to the manufacturers instructions im most cases between 20mm – 30mm. Cut the pipes using a pipe cutter to ensure a square cut and the ends are then de-burred.
Clean both pipes so you have a nice clean surface to fix to. If copper pipe is used, use wire wool or plumbers mesh strips to clean.
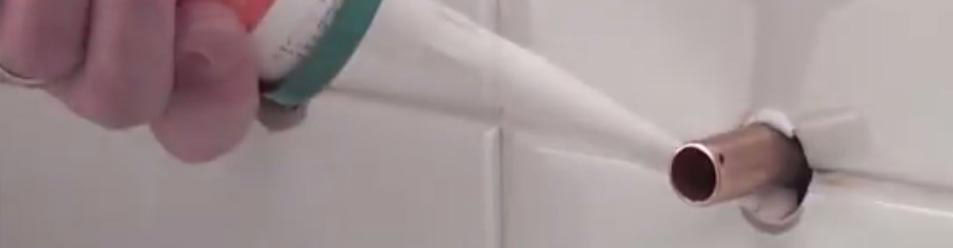
Once the pipes are cut to the correct length, ensure the holes around the pipes are sealed using silicone sealant.
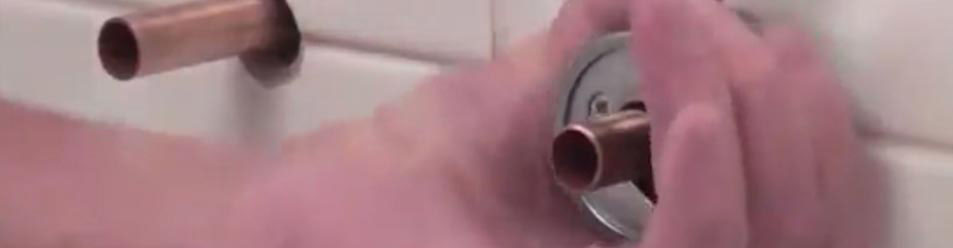
The wall plates are then slid over the pipes (both are the same) and the holes to be marked and drilled. Use a small spirit level across the wall plates to ensure that the holes to be drilled level.
Also ensure you are drilling either side of the pipework buried within the wall.
Once the holes are drilled in the correct location, hammer in wall plugs or correct fixing for the wall to give a strong fitting.
The wall plates can then screwed to the wall. A small amount of silicon can be added to the back side of the wall plate to ensure a waterproof seal. Do not use a drill to screw tight! Drills have too much power and can crack the tile and strip the screw heads.
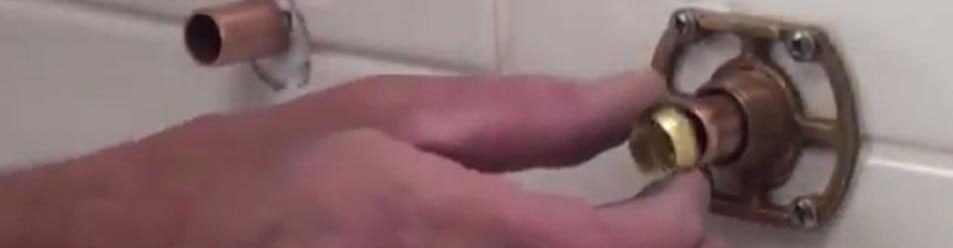
Slide the olives over the pipes and then screw on the fixing bridge by hand.
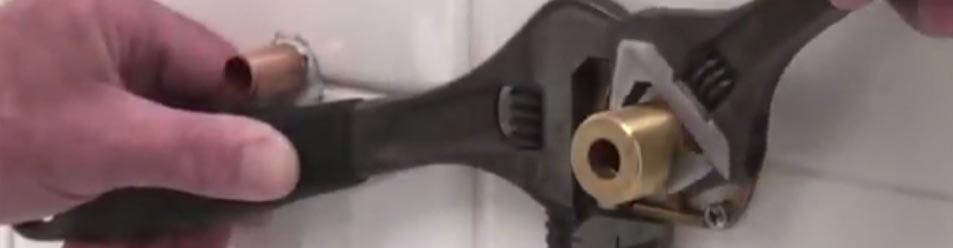
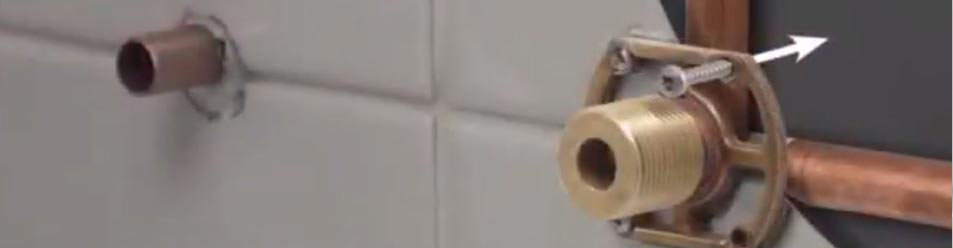
Next you need to tighten the fixing bridge against the wall plate. This will crush the olive against the pipe and form a watertight seal.
To do this, use two adjustable spanners. One to grip the fixing bridge and the other to grip the wall plate. Turn the fixing bridge clockwise until tight.
Screw the pipe collars onto the fixing bridge thread until they meet the tiled wall.
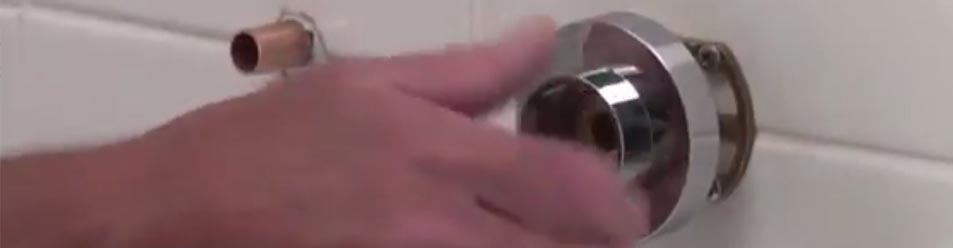
You are now ready to attach the bar mixer shower to the fixing kit ensuring that all necessary rubber washers and filters are in place. These should come with the shower valve. Take care not to damage the chrome plated surfaces.
We hope you find this article helpful. Check out or range of shower valves and fast fit shower kits available to purchase today from Rubberduck Bathrooms.
This guide was created for reference only. www.rubberduckbathrooms.co.uk can not be held responsible for injury or damage caused if you decide to use this method.


