
- Shower Panels
-
Showering
- Shower Doors & Enclosures
- Walk In Showers
- Shower Trays
- Shower Valves
- Bath Shower Screens
- Shower Accessories & Spares
- Shower Pumps
- View all products...
-
Bathroom Suites
- Complete Bathroom Suites
- Baths
- Toilets & Bidets
- Basins
- View all products...
-
Furniture
- Bathroom Furniture
- Mirrored Bathroom Cabinets
- Toilets & Cisterns For Furniture
- Worktops & Vanity Counter Tops
- View all products...
- Taps
- Radiators
- Wet Rooms
-
Ceilings, Floors, Tiles
- PVC Ceiling Panels
- Bathroom Flooring
- Tiles, Tile Trims & Adhesives
- Underfloor / Undertile Heating
- View all products...
- Accessories
- Extras
- Plumbing
- Shower Panels
-
Showering
- Shower Doors & Enclosures
- Walk In Showers
- Shower Trays
- Shower Valves
- Bath Shower Screens
- Shower Accessories & Spares
- Shower Pumps
- View all products...
-
Bathroom Suites
- Complete Bathroom Suites
- Baths
- Toilets & Bidets
- Basins
- View all products...
-
Furniture
- Bathroom Furniture
- Mirrored Bathroom Cabinets
- Toilets & Cisterns For Furniture
- Worktops & Vanity Counter Tops
- View all products...
- Taps
- Radiators
- Wet Rooms
-
Ceilings, Floors, Tiles
- PVC Ceiling Panels
- Bathroom Flooring
- Tiles, Tile Trims & Adhesives
- Underfloor / Undertile Heating
- View all products...
- Accessories
- Extras
- Plumbing

How to Install Atlantis Wet Wall Panels: A Step-by-Step Guide
Atlantis Wet Wall panels offer a stylish, waterproof alternative to traditional bathroom wall finishes. They are available in a range of colours, textures and designs, making them a great choice for shower enclosures, bathrooms and wet rooms.
With the right preparation, suitable adhesive and waterproof sealant, Atlantis panels can be fitted directly to several types of wall or installed onto wall battens where needed.
In this guide, we explain how to prepare your walls, cut your panels, fit the trims and seal the joints correctly. Always read the manufacturer's installation guide in full before starting work.
Before You Start: What You Need to Know
Before fitting your Atlantis Wet Wall panels, take time to check the panels and prepare the installation area.
Check your panels before installation. Make sure the décor and colour are correct and inspect the panels for any visible defects. Atlantis advises that claims relating to these issues cannot be considered once installation has started.
Allow the panels to acclimatise. Store the panels, adhesive and sealant at normal room temperature for at least 24 hours before installation. Where possible, keep them in the room where they will be fitted.
Store the panels correctly. Keep panels flat to prevent bowing, with the decorative surfaces facing one another. Do not store them outdoors or in wet or humid conditions.
Check the walls and shower tray. The shower tray must already be installed, level and adequately sealed to the wall. All piping must be installed to stub-end before you begin fitting the panels.

Step 1: Gather Your Trims, Adhesive and Sealant
Make sure you have the correct trims, suitable adhesive and waterproof sealant ready before starting.
Atlantis provides four main trim options for different parts of the installation:
- Internal corner trim: Used where panels meet at an internal wall corner.
- External corner trim: Used on external 90-degree corners.
- Continuous trim: Used to join two panels side by side on a back wall.
- End cap trim: Used to finish the exposed cut edges of square-edge panels.
Atlantis also offers tongue and groove (T&G) panels, which connect without the need for a continuous joining trim.
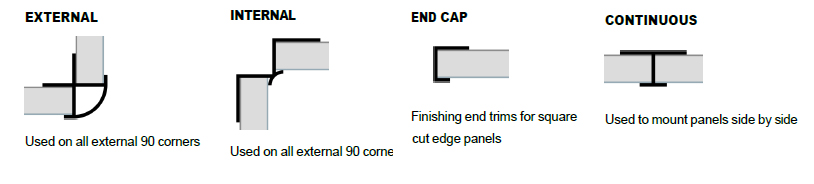
Choose the correct trims for your layout before cutting or fitting the panels. Always apply waterproof sealant inside the relevant trim before inserting the panel.
Step 2: Prepare the Walls and Shower Area
Good preparation is essential for a neat finish and a watertight installation.
Atlantis panels can be fitted directly to plastered walls, plasterboard, concrete, chipboard or existing tiled walls using suitable adhesive and waterproof sealant. Alternatively, you can mount the panels on wall battens.
Before proceeding:
- Check that the shower tray is level using a spirit level and is properly sealed against the wall.
- Do not install the panels over the shower tray. If the tray has an upstand, Atlantis recommends recessing it into the wall where possible.
- Check that the walls are flat and plumb. If they are not, use wall battens and ensure the battens are plumb and square.
- If bonding directly to the wall, make sure the surface is sound, clean, dry and free from grease, dirt and dust.
- Remove any loose tiles and high spots if fitting the panels over an existing tiled wall.
- Make sure any source of dampness has been eliminated.
- Protect the shower tray with suitable covering material before starting work.
Do not begin installation until the wall surface is properly prepared and completely dry.
Step 3: Measure and Cut the Panels
Measure the wall carefully and mark the panels before cutting. Check your measurements and confirm that each panel has the correct décor and colour.
Wear gloves when cutting the panels. Atlantis warns that the panel edges and corners are sharp.
The cutting direction depends on the tool you use:
- Fine-toothed handsaw: Keep the decorative surface facing upwards.
- Jigsaw or circular saw: Keep the decorative surface facing downwards.
Cut into the decorative face of the panel to help prevent chipping of the laminate surface. Make sure all cuts are square.
When cutting holes for shower heads, pipework or other fittings, leave an expansion gap of at least 3mm around the cut-out. These gaps must be filled with sealant after the panels have been fitted.
Step 4: Fit the Internal Corner Trim
Atlantis recommends starting in an internal corner and working outwards.
Apply a continuous bead of adhesive to the reverse of the internal corner trim. Position the trim in the corner and use a spirit level to make sure it is plumb.
Once the trim is correctly positioned, apply a continuous bead of waterproof sealant inside one recess of the trim. This will help create a sealed joint when the panel is inserted.
Take care to position the trim correctly, as it will guide the panel into place.
Step 5: Prepare the Panel Edges and Trims
Before fixing the first panel, prepare the exposed edges and any joining trims.
Apply a continuous bead of sealant inside the end cap trim and fit it to the edge of the panel. Use enough sealant for it to spread beyond the trim, then wipe away any excess.
Follow the same process when using a continuous trim to connect two panels.
If you are using tongue and groove panels, apply a continuous bead of sealant or adhesive along the length of the profile, as specified in the Atlantis installation guide. Wipe away excess material.
Do not skip sealing the joints. Atlantis requires the panel edges and joints to be correctly sealed to maintain a watertight installation.
Step 6: Apply Adhesive to the Wall
Apply the suitable adhesive directly to the prepared wall in a series of waves, running from the top to the bottom of the area where the panel will sit.
Make sure the adhesive is applied across the intended fixing area and follow the instructions supplied with your chosen adhesive.
Prepare only the area needed for the panel you are fitting, so you can position the panel accurately.
Step 7: Position and Secure the First Panel
Place 3mm-high spacers along the back edge of the shower tray. These create the required 3mm gap between the bottom of the panel and the tray.
Position the panel above the spacers and slide it into the recess of the internal corner trim.
Check that the panel is correctly aligned and that the sealant envelopes the panel within the trim. Wipe away any excess sealant.
The gap at the bottom of the panel is important. It must be filled with sealant to create a waterproof joint.
Repeat the preparation and fitting process for the second panel, or continue with the remaining panels in your layout.
Step 8: Join the Panels and Seal the Bottom Edge
Once the panels are positioned, check the joints and make sure the panels are correctly aligned.
Apply sealant to the bottom joint of the panels, filling the gap between the panels and the shower tray.
Where two square-edge panels meet, use the appropriate continuous trim. If you have chosen the tongue and groove system, ensure the joint has been sealed along the full length of the profile.
Remember to seal inside each relevant trim before inserting the panel. This helps prevent water from entering the joints.
Step 9: Seal All Cut-Outs and Joints
Check the complete installation carefully before using the shower.
Any holes or cut-outs for shower heads, pipework and other fittings must have an expansion gap of at least 3mm. Once the panels are fitted, fill these gaps with sealant.
Check that:
- All panel joints are properly sealed.
- Internal and external corner trims are sealed correctly.
- Exposed cut edges have the appropriate end cap trim where required.
- The bottom joint between the panels and shower tray is sealed.
- All cut-outs have been sealed around their edges.
Pay particular attention to areas where water may reach the joints or cut edges. Correct sealing is essential to help keep the installation watertight.
Step 10: Allow 24 Hours Before Use
Once installation is complete, leave the panels for 24 hours before using the shower.
Allow the adhesive and sealant to set in accordance with their own product instructions as well. If the products specify a longer setting time, follow the relevant instructions before exposing the installation to water.

How to Clean and Maintain Atlantis Wet Wall Panels
Atlantis panels are designed to require minimal maintenance, but regular care is important to keep them looking their best and protect the installation.
For routine cleaning:
- Wipe the panels with a non-abrasive damp cloth.
- Use a mild spray detergent.
- Do not use abrasive cleaners.
- Do not use bleach.
Check the sealant regularly. Atlantis advises that sealant needs to be replaced at regular intervals. If the sealant deteriorates, water may enter the joints and damage the panels. Failure to maintain the sealant can also invalidate the guarantee.
Atlantis Wet Wall Panels: Installation Tips to Remember
Before finishing your project, keep these key requirements in mind:
- Acclimatise the panels, adhesive and sealant at normal room temperature for at least 24 hours before installation.
- Make sure the shower tray is installed, level and adequately sealed before fitting the panels.
- Ensure the walls are clean, dry, sound and suitable for the chosen fixing method.
- Wear gloves when cutting the panels and follow the correct cutting direction for your saw.
- Leave a minimum 3mm expansion gap around cut-outs and at the base of the panels.
- Seal the panel edges, trims and joints correctly using waterproof sealant.
- Leave the installation for 24 hours before use.
- Clean with a non-abrasive damp cloth and mild spray detergent, avoiding abrasive cleaners and bleach.
- Replace sealant at regular intervals to help prevent water ingress.
Atlantis Wet Wall Guarantee
Atlantis states that its wall panels are guaranteed against defects for 20 years from the date of purchase, provided they are correctly fitted, thoroughly sealed and maintained.
The manufacturer's installation guide makes clear that the guarantee is conditional on following the installation procedures. Incorrect storage, poor sealing or inadequate maintenance can invalidate the guarantee.
For this reason, always read the full Atlantis installation guide before starting work. If you are unsure about any part of the installation, contact your supplier for clarification before proceeding.
Shop Atlantis Wet Wall Panels at Rubberduck Bathrooms
Looking for a stylish alternative to traditional bathroom wall finishes? Explore our range of bathroom wall boards and the Atlantis Wet Wall range at Rubberduck Bathrooms and discover a choice of colours, textures and designs for your bathroom or shower enclosure.
Choose the finish that suits your space and make sure you have the correct trims, adhesive and sealant for your installation before you begin.
Please note: This guide is based on the Atlantis Wet Wall 2023 Installation Guide and information published on the manufacturer's website. Always refer to the latest manufacturer instructions for your specific panels and installation.

Atlantis Wet Wall Panels FAQs
About Atlantis Wet Wall Panels
Are Atlantis Wet Wall panels waterproof?
Yes. Atlantis describes its panels as fully waterproof, making them suitable for showers, bathrooms and wet rooms. However, the panels must be fitted correctly, with all cut edges and joints properly sealed, to help prevent water ingress.
Can Atlantis Wet Wall panels be used in wet areas?
Yes. Atlantis Wet Wall panels are designed for use in showers, bathrooms and wet rooms. Correct installation and sealing are essential to maintain a watertight finish.
Are Atlantis Wet Wall panels tongue and groove (T&G)?
Atlantis offers both square-edge panels and tongue and groove (T&G) panels. T&G panels connect together without the need for a continuous joining trim. The T&G option carries an additional cost and a further 14-day lead time, according to the manufacturer's installation guide.
Do Atlantis Wet Wall panels have a guarantee?
Yes. Atlantis provides a 20-year guarantee against defects from the date of purchase, provided the panels are correctly fitted, thoroughly sealed and maintained. Always follow the manufacturer's installation and maintenance instructions to help keep the guarantee valid.
Do Atlantis Wet Wall panels need much maintenance?
Atlantis panels require minimal maintenance. Clean them with a non-abrasive damp cloth and mild spray detergent. Avoid abrasive cleaners and bleach, and check the sealant regularly.
Fitting Atlantis Wet Wall Panels
Can you fit Atlantis Wet Wall panels over existing tiles?
Yes. Atlantis panels can be fitted directly over existing tiled walls using suitable adhesive and waterproof sealant. Remove any loose tiles and make sure the surface is free from high spots that could affect the panel finish.
Can you stick Atlantis Wet Wall panels directly to plasterboard?
Yes. Atlantis panels can be fitted directly to plasterboard using suitable adhesive and waterproof sealant. The wall must be sound, clean, dry and free from grease, dirt and dust before installation.
Can Atlantis Wet Wall panels be fitted to plastered walls?
Yes. Atlantis panels can be fitted directly to plastered walls, provided the surface is suitable, sound, clean and completely dry. Use the appropriate adhesive and waterproof sealant.
Can Atlantis Wet Wall panels be fitted to concrete walls?
Yes. Atlantis panels can be fitted directly to concrete using suitable adhesive and waterproof sealant. Make sure the wall is clean, dry, sound and properly prepared.
Can Atlantis Wet Wall panels be fitted to wall battens?
Yes. Atlantis confirms that its panels can be mounted on wall battens as an alternative to fixing directly to the wall. The battens must be plumb and square. Follow the manufacturer's installation instructions for the appropriate fixing method.
Do I need to remove old tiles before fitting Atlantis Wet Wall panels?
Not necessarily. Atlantis panels can be fitted over an existing tiled wall. However, any loose tiles must be removed, and the surface must be free from high spots. Make sure the wall is suitable for the chosen adhesive and fixing method.
Do I need to waterproof the wall before fitting Atlantis Wet Wall panels?
The Atlantis installation guide requires the wall to be sound, clean and completely dry, with any source of dampness eliminated. It also requires suitable adhesive and waterproof sealant, with all panel joints and cut edges correctly sealed. Follow the full installation instructions for your particular wall and installation.
Can Atlantis Wet Wall panels be fitted straight onto a shower tray?
No. Atlantis instructs installers not to install the panels over the shower tray. The tray must already be fitted, level and adequately sealed to the wall. A 3mm gap should be left between the bottom of the panels and the tray, then filled with sealant.
Do I need special trims for Atlantis Wet Wall panels?
The trims you need depend on your installation. Atlantis offers internal corner trims, external corner trims, continuous trims and end cap trims. These help finish corners, join panels and cover exposed cut edges. Tongue and groove panels can connect without a continuous joining trim.
Do Atlantis Wet Wall panels need to be sealed?
Yes. All panel joints and cut edges must be correctly sealed with waterproof sealant. Sealant must also be applied inside the relevant trims before the panels are inserted. Correct sealing is essential to help prevent water ingress and protect the installation.
Do I need to seal tongue and groove joints?
Yes. Atlantis specifies that a continuous bead of sealant or adhesive must be applied along the length of the tongue and groove profile, as directed in its installation guide. The joints must be waterproof, and any excess sealant should be wiped away.
Do I need to leave an expansion gap when fitting Atlantis Wet Wall panels?
Yes. Atlantis specifies a 3mm gap at the bottom of the panels above the shower tray. Cut-outs for shower heads, pipework and similar fittings must also have an expansion gap of at least 3mm. These gaps must be filled with sealant after fitting.
How long should Atlantis Wet Wall panels acclimatise before fitting?
Atlantis recommends keeping the panels, adhesive and sealant at normal room temperature for at least 24 hours before installation. Where possible, store them in the room where they will be fitted.
How long after installation can I use my shower?
Atlantis advises leaving the panels for 24 hours before use. You should also follow the adhesive and sealant manufacturer's instructions, including any longer setting times.
Cutting and Finishing Atlantis Wet Wall Panels
Can Atlantis Wet Wall panels be cut to size?
Yes. Atlantis panels can be cut to suit your installation. Use a fine-toothed handsaw with the decorative face upwards, or a jigsaw or circular saw with the decorative face downwards. Atlantis recommends wearing gloves because the edges and corners are sharp.
Can I cut holes in Atlantis Wet Wall panels for shower fittings?
Yes. You can cut holes for shower heads, pipework and other fittings. Leave an expansion gap of at least 3mm around each cut-out and fill the gap with sealant after fitting the panels.
Do Atlantis Wet Wall panels need a joining trim?
Not always. Square-edge panels can be joined using a continuous trim. Atlantis tongue and groove panels connect without the need for a continuous joining trim, although the joints must still be sealed correctly.
Do Atlantis Wet Wall panels pattern match?
Pattern matching can depend on the particular décor and panel design. The Atlantis installation guide does not confirm that every design is pattern matched. Check the specific décor details with your supplier before ordering if you need a continuous pattern across adjoining panels.
Can Atlantis Wet Wall panels be installed horizontally?
The installation guide does not confirm whether every panel can be installed horizontally. Check the manufacturer's instructions for your specific panel and intended layout before installation.
Cleaning and Care
What is the best way to clean Atlantis Wet Wall panels?
Use a non-abrasive damp cloth and a mild spray detergent. This is the cleaning method recommended by Atlantis.
Can I use bleach or abrasive cleaners on Atlantis Wet Wall panels?
No. Atlantis specifically states that abrasive cleaners and bleach must not be used on its panels, as they can damage the finish.
How often should I replace the sealant around Atlantis Wet Wall panels?
Atlantis recommends replacing sealant at regular intervals but does not specify a fixed replacement period in its installation guide. Check the sealant regularly and replace it when required to help prevent water ingress and potential panel damage.
This guide was created for reference only. www.rubberduckbathrooms.co.uk can not be held responsible for injury or damage caused if you decide to use this method.


