- Shower Panels
-
Showering
- Shower Doors & Enclosures
- Walk In Showers
- Shower Trays
- Shower Valves
- Bath Shower Screens
- Shower Accessories & Spares
- Shower Pumps
- View all products...
-
Bathroom Suites
- Complete Bathroom Suites
- Baths
- Toilets & Bidets
- Basins
- View all products...
-
Furniture
- Bathroom Furniture
- Wall Cabinets
- Toilets & Cisterns For Furniture
- Worktops & Vanity Counter Tops
- View all products...
- Taps
- Radiators
- Wet Rooms
-
Ceilings, Floors, Tiles
- PVC Ceiling Panels
- Bathroom Flooring
- Tiles, Tile Trims & Adhesives
- Underfloor / Undertile Heating
- View all products...
- Accessories
- Extras
- Plumbing
Aqua Strap Installation Guide
AquaStrap Installation Instructions for Shower Trays & Baths. Apply a similar procedure for Worktops where appropriate.

1. Roughen the side walls of the tray or bath where the AquaStrap is to be affixed with wire wool, please ensure you clean the surfaces with alcohol wipes once done.
2 - 3. Unroll the AquaStrap along the length of the first side wall and 20cm beyond the corner. Peel back the upper lining (c) 10cm. Keep the top of the aligning cord (a) level with the top of the ledge (e) and use your thumb to press the exposed adhesive face of the strap on to the side wall of the tray or bath> ( If your Tray or bath has very round corners see Fig: 17 at the bottom of this document.)
4. Continue this process until the first side is complete ensuring the lining is removed 15cm beyond the corner.

5 - 6. Lift Up the lower part of the AquaStrap (d) at a right angle to the side wall of the product being fitted and peel off (pulling downward) the lower release liner (b) 150mm beyond the corner.
7. Press the lower part of the AquaStrap adhesive face (from the top down over) against the side wall ensuring all air pockets are expelled in the process.
8. If the shower tray or bath has rounded corners, the adhesive should be bulked up (pinched) to maintain a 90° angle around the corner.

9 - 11. Continue Installing the AquaStrap on to the remaining side walls as above.

12. Rubberduck Bathrooms recommend using a seam roller to ensure a full seal contact between the adhesive strap and the side walls.
13. Cut the foam strip (sent with your kit) to a length of 45mm, use these to Cap the adhesive ends leaving no adhesive pieces on show.
14. Once the shower tray or bath is located in position, bond the part of the aqua strap extending above the ledge to the adjacent wall with a polymer adhesive.
15 - 16. Apply Sealux-N in between the tile or shower board and ledge joint.
Rubberduck Bathrooms recommends that Sealux-N or an equivalent neutral curing silicone is applied to the tile/shower board/ledge movement joint.
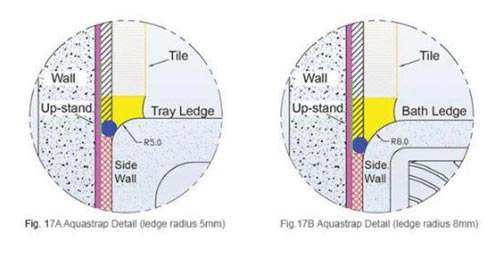
17A - 17B. The Position of the seal aligning cord ( in Blue) on the shower tray or bath sidewall is determined by the radius of the ledge/sidewall corner.
Installers should ensure the AquaStrap is aligned at a level on the sidewall that ensures the seal aligning cord forms a pressure seal between the up-stand on one side and the sidewall on the other side to ensure contact is avoided between the Silicone (Yellow) and Butyl adhesive (Red). Use Sealux-N or equivalent Neutral Cure Silicone between the til/ shower boards and the ledge.
To purchase an Aquastrap Click Here
This guide was created for reference only. www.rubberduckbathrooms.co.uk can not be held responsible for injury or damage caused if you decide to use this method.


